Monday, February 18, 2013

Buffing Out The Scratches

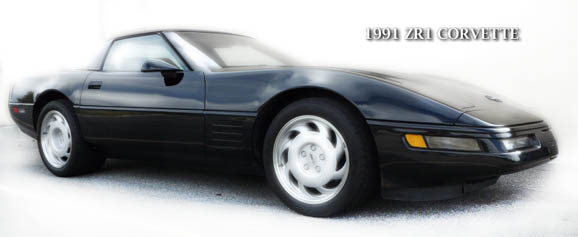
First lets get one thing straight. The best color for a ZR1 is black. However black paint is the absolute worst color to keep looking good.  Dust seems attracted to black paint like there is some sort of universal law dictating the bond between them. Scratches, even tiny ones show up in direct sunlight further complicating the love affair.  What to do?

First, the dust situation is minimized with the use of a California duster. This duster has wax slathered in the fibers while  most other brands do not, that makes the difference between brands.  The wax does not rub off onto the paint but traps the dust so it does not fall back onto the car.  Other brands are pretty worthless.

Waxing and a daily dusting will take care of part of the black paint issue but beyond that is where we decide to take the luster one step further. Buffing. This is a step that can not be rushed if you want good results.  As a general rule, the more time you take the better the results.

The  decision to buff by hand or use an electric buffer is dependant upon how deep the scratches are.  If the scratches and swirl marks are light, hand buffing might work.  For more extensive scratches, use an orbital buffer.  Harbor Freight has them for about $20.

There are several good products but I use Beyond Clay.  It comes in a fairly small container but goes a long way.  A half bottle did my entire car.

Before starting, wash your car. Use a dewaxer, or if you have not waxed in a while you might get away with just a thorough washing.  Once you start buffing you will know you have an old wax problem if the buffing paste is difficult to remove or gums up. At this point, stop and dewax. It will not get any easier if you do not.  Remove the hood logo by unbolting from under the hood.  Use a magnetic socket so the nuts do not fall off inside the hood.  If they do drop off you can use a magnet to fish them out.  There will be a lot of filth and muck under the emblem so clean it well before buffing.

To begin buffing, start with the hood. That's the most noticeable and the most fun.  You will want to have good light positioned over the area you are buffing. Do not buff outside if you can avoid it.  And never in direct sunlight. It will dry out the paste to quickly.  If you have recently driven tha car, let the hood cool down before buffing.

I recommend using a buffer because the job will go more quickly. The word "quickly" is relative.

Look over the area you are buffing. Pick an area of about 1 square foot and look at it at an angle that shows the scratches the best.  Put about 1/2 teaspoon of paste on the buffing pad. Before starting the buffer, place the pad flat on the surface and move it around a bit to smear the paste on the pad.

Turn on the buffer and with slight circular motions buff away!

Note: It is extremely important to keep your pad absolutely clean.  You do not want to introduce more scratches.

After a period of time equal to that which you decide is long enough.  Take a microfiber towel and begin polishing the freshly buffed area.  Do not let the paste dry.  After you have polished with the towel, you will see a difference but it's not quite perfect.  Continue this process until you have a factory finish.  The effort you make could save you thousands of dollars for a new paint job.

When you are done. Rewax your car and be amazed!
Good luck!


Friday, December 16, 2011

New Spec clutch (wrong fly from Summit)

Just put in a new Spec stage 1 clutch.  It's a little noisy and jerky taking off but is smoothing out some.   I had ordered a new flywheel from Summit but even though it was advertised as fitting a 1991 ZR1 it did not.  If you order a fly from Summit, call them to make sure it will fit.  You don't want to leave your car torn apart for another week or two waiting for the replacement.

My car has about 27K miles on it and even though it's 20 years old, drives like new!  Don't be fooled by the nay sayers, C4 ZR1's are extremely well built and as much fun to drive as a new one.. almost. :)

This morning while on a drive, a pimped up little rice burner pulled along side and initiated a challenge. I downshifted from 6th to fourth and floored it for about 3 seconds.  The demonstration was over.  I love this car!  :)

Wednesday, November 9, 2011

1991 Clutch Pilot bearing is self destructing...

Ok, so I have been hearing clutch whines from time to time then all of a sudden it's really bad!  Apparently the pilot bearing is trying to eat itself.   If you are hearing the initial intermittent clutch whine, don't wait, get on it quick before other damage is caused.  It was amazing how fast it went from annoying to potentially destructive!  I have a clutch ordered and will be installed on Monday.

It saddens me when my ZR1 is in discomfort and sits in the garage.   Being it's my DD, I am now reduced to commuting in 30 degree weather on my 09 YZFR1.   I hope it doesn't snow!

1991 ZR1-1996 Eldorado (fairly) Compatible Bose Stereo Amp

Since I have become obsessed with the stereo amp issue I spent the afternoon removing speakers at the wrecking yard to see what might work as a replacement amp for the ZR1.  I heard that the Nissan Maxima had the same amp as the 1991 ZR1 but upon removing one from the yard it's not even close. (Possibly just a basic model car and did not have an upgraded Bose sound system).

I did however find an amp from a 1996 Eldorado that is compatible.  It takes a little modification because the circuit board is a bit larger, but it works great.  It's a plain old Bose amp, not the AC Delco Bose.  I think the Eldorado version sounds even better than the original.  So, if you want to use an Eldorado amp it will work (uses the same connection) but will take a bit of creativity making it fit.  The rear should be no problem but the front speakers have limited space. I know it sounds like a bit of a hack job but it's really not that bad, especially if it sounds better.  :)

Wednesday, November 2, 2011

Friday, October 28, 2011

Radio amp update (speakers that buzz, hum and hiss etc.)

I have made the first amp fix and made some notes.
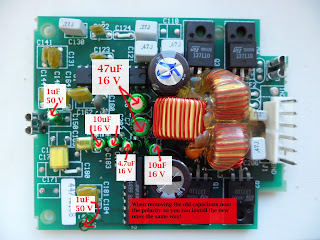
1. I tried other value capacitors with a higher rating and it worked but there was a pop when starting the radio.
2. Use only the listed rating capacitors and it works fine.
3. You can pull the green capacitors out of there wires with needle nose pliers. Just wiggle the capacitor a bit and then pull them off.
4. Heat up the back side of the board on each existing wire and they come off easily.
5. Try to leave solder in the holes to attach the new capacitors. If all the solder comes out it makes it hard to get the new ones to stick.
6. The problem is fixed if the green can capacitors are replaced.
7. You could attach the new capacitors to the back side of the board which might be easier but you will need to reattach the board a little higher off the speaker to clear the new parts.  There is plenty of room in the enclosure for this.
8. The cost of the parts off Ebay were about $12 to fix all 4 amps.  It takes a little time to do it but saves between $200 to $300 (or more) for new amps.  I'd rather spend that money on something fun, like gas!

Friday, October 21, 2011

Order the capacitor's on Ebay

I decided to order the capacitor's to fix the stereo amps from Ebay.  The price was right, probably only $12 for way more than I will need.  I will post the results of the fix after I replace them.

Tuesday, October 18, 2011

Fixing the factory speaker amps....


This image shows the front right amp board after the new capacitors are installed.
(Front amps  have one less capacitor to change out)
Note: You don't need to put the capacitor wires through the board as long as
solder is still going through the board.  Surface mounting the capacitors
is easier and works just the same.  When removing the old capacitors leave the
wires running through the board. that way a good contact is maintained.
 It may not be the prettiest soldering job but it works.

Use a soldering iron with a fine point and allow it to heat up fully.

ZR1 Radio Problems

I ran across a fix for the radio issues in the early ZR1's.  I will try to post some pics soon but it has to do with the capacitors on the speaker amp boards.  Each speaker has an amp with the faulty capacitors.  I will post the capacitor specs with the pictures.

There are eight green can-type suspect capacitors on each amp board that over time leak, causing symptoms from hissing to buzzing in the affected speaker.  It should be a pretty easy fix but might take some time and patience.
More later...

Monday, October 17, 2011

All things ZR1 (and all Corvettes) Questions and Answers

Does anyone have a fix for a faulty climate temperature control on a 1991 ZR1? Mine cycles down easily but to raise the temp is pretty ify. It works about once out of twenty trys.